
![[How To] Best Dedicated Server: Choose The Best Dedicated Server For Less](https://easypromocode.com/wp-content/uploads/2020/05/dedicated_server-2-100x65.jpg)


Main Contents
ServerPilot is a server management platform that helps you launch and manage PHP applications like WordPress easily. In particular, ServerPilot helps you to install, manage applications optimally and without the resources for the Control Panel. You can easily manage the server as well as the PHP application right on the ServerPilot administration page :
- Install software – ServerPilot installs all necessary software for the server, including PHP, MySQL, Apache (using Nginx as the front-end proxy).
- Firewall Configuration – ServerPilot security system with iptables firewall.
- Automatic Updates – Server will always be updated and optimized.
- Simple administration – Admin interface makes it easy to create multiple websites, manage databases, run multiple PHP versions, install SSL …
- Automatic SSL – With AutoSSL, applications are SSL-secured free and automatic.
- Statistics and monitoring – ServerPilot provides complete statistics on both application and server
As can be seen, ServerPilot provides everything needed to install and manage applications/websites on VPS. In addition, the paid version supports many useful features when your system extends, referring to ServerPilot Features .
To install, you need a brand new server. You can refer to Contabo, Ramnode or Linode
- Operating System: Ubuntu LTS 16.04 or 18.04 64bit
- Kernel> = 3.2 using any virtualization technology except OpenVZ / RHEL 6
- RAM: 256MB minimum
Install ServerPilot
1.1. Automatic installation
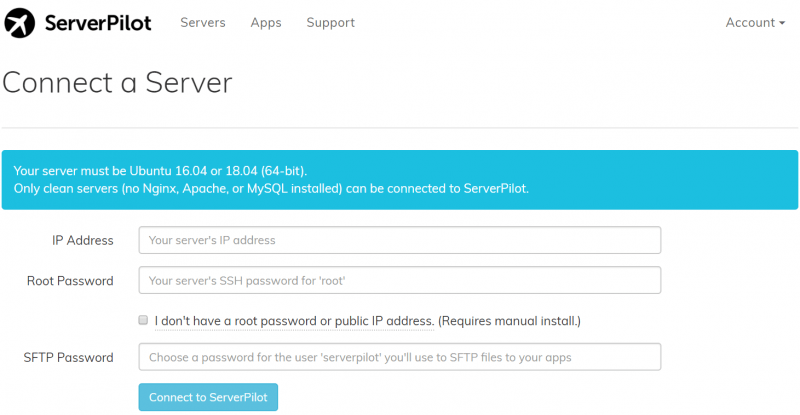
– Firstly, make available Ubuntu LTS 16.04 or 18.04 VPS and register your account at the ServerPilot homepage
– Login account on ServerPilot, select Connect Server. Enter the required information, in which, SFTP Password is the password used later for user serverpilot . – Then wait 5 ‘- 10’ for the installation to complete and use.
– Login SSH using private users (such as serverpilot), not root to avoid conflicts. The root directory of each user at /srv/users/username
– Can change root password after successful installation.
1.2. Manual installation
In case you do not have root account access, you need to install it manually.
Specifically, select I do not have a root password or public IP address. (Requires manual install.) And enter the hostname of the VPS. You will then be provided with the install sequence directly on the VPS, for example
sudo apt-get update && sudo apt-get -y install ca-certificates wget && \
sudo wget -nv -O serverpilot-installer https://download.serverpilot.io/serverpilot-installer && \
sudo sh serverpilot-installer \
    --server-id=GNNWzfD8xuKu2Tz3 \
    --server-apikey=Kkkloyjiu6Szq6nycSLMecvPN3nkFz3DUt4Ojtdfvlk
Login SSH and install as usual. Successfully, the management console will appear on the ServerPilot page.
2. Add Website
On ServerPilot, websites, apps are generally called App.
To add, select Create App. Also, choose WordPress if you want to install this source code.
Note : To create & use a different user with the default serverpilot user , you need to use the subscription package and select Create System User. Successfully created, you can use and manage the website
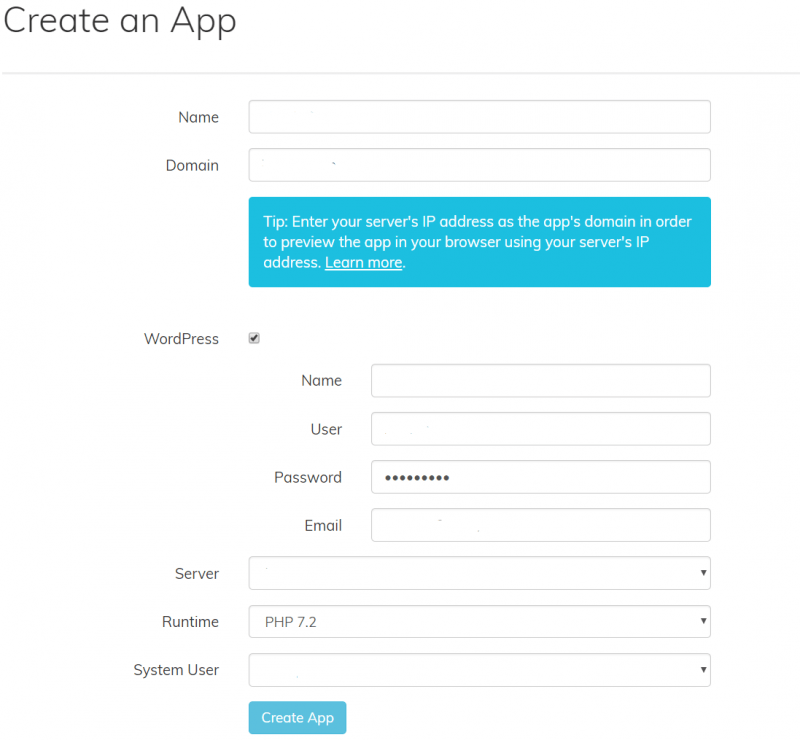
- Database: Database and Usernames attached
- Source directory:
root_folder/apps/app_name/public - PHP version: change as per the settings of each website
3. File and path are important
When using ServerPilot, there are some configuration paths you need to know to use when needed.
| Service | Path | |
| Apache | /etc/apache-sp | service apache-sp status |
| Nginx | /etc/nginx-sp | service nginx-sp status nginx-sp -t |
| PHP 5.6 | /etc/php5.6-sp | |
| PHP 7.0 | /etc/php7.0-sp | |
| PHP 7.1 | /etc/php7.1-sp | |
| PHP 7.2 | /etc/php7.2-sp | |
| MySQL | /etc/mysql | service mysql status |
4. Install Let’s Encrypt automatically
Currently, AutoSSL is only available in paid versions so you can use the Github Serverpilot Let’s Encrypt stack script.
– Log in as root, download scripts to VPS and run permissions
# cd /usr/local/bin && wget https://raw.githubusercontent.com/lesaff/serverpilot-letsencrypt/master/sple.sh
# chmod +x sple.sh
– Run the script and enter the information as required
# sple.sh
Let's Encrypt is not installed/found. Would you like to continue to install it?
Y or N Y
=-=-=-=-=-=-=-=-=-=-=-=-=-=-=-=-=-=-=-=-=-=-=-=-=-=-=-=-=-=-=-=-=-=-=-=-=-=-=-=-=
  Let's Encrypt SSL Certificate Generator
  For ServerPilot-managed server instances
  Written by Rudy Affandi (2016)
  https://github.com/lesaff
=-=-=-=-=-=-=-=-=-=-=-=-=-=-=-=-=-=-=-=-=-=-=-=-=-=-=-=-=-=-=-=-=-=-=-=-=-=-=-=-=
Please enter your app name: your app name
Please enter the System User name for the app: username(serverpilot)
Please enter all the domain names and sub-domain names you would like to use, separated by space :   your domain name (cả non-www và www)
Successful installation results
We're almost done here. Opening HTTPS Port and  Restarting nginx...
Skipping adding existing rule
Skipping adding existing rule (v6)

Your Let's Encrypt SSL certificate has been installed. Please update your .htaccess to force HTTPS on your app

To enable auto-renewal, add the following to your crontab:
0 */12 * * * letsencrypt renew && service nginx-sp reload
Cheers!
– Configure redirect HTTPS by editing .htaccess
RewriteEngine on
# Force SSL
RewriteCond %{SERVER_PORT} ^80$
RewriteRule ^(.*)$ https://%{SERVER_NAME}%{REQUEST_URI} [L,R]
If you have one RewriteEngine onthen just add 3 lines of # Force SSL below just finished.
– Install crontab to automatically refresh the certificate when it expires
# EDITOR=nano crontab -e
And add the following to the end and then save
0 */12 * * * letsencrypt renew && service nginx-sp reload
Good luck to you! Need help please leave a comment.